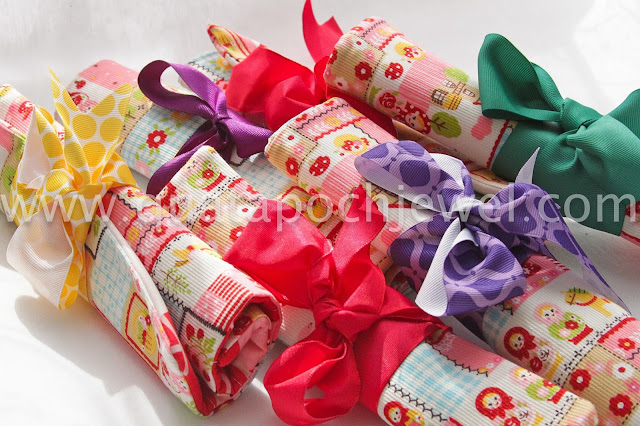
So, the first birthday bash is coming up next month. I figured if I do a little at a time, the task will be fun, creative and not overwhelming. We decided on an art theme birthday party. Miss V plans on inviting 5-6 girlfriends. We'll have the table set up with canvases, a few options of pre-drawn art that they can transfer to their canvases (or if they want to draw/paint their own ideas, even better!). I have decided for favors, I will be making art paintbrush rolls & aprons to go along with the canvas they will paint. The centerpiece (i hope!) will be a tiered cake stand filled up with a variety of acrylic paints. It's all drawn out on paper, imagined in my mind. I'm keeping my fingers crossed that i can pull this off and make her 10th birthday extra special.
Because some of this stuff is simple yet fun, I thought I'd create tutorials to go along. So check back for my next installment which will probably be the aprons and then maybe another installment for decorating (I'm thinking polka dots, streamers and balloons!) Until then, I hope you enjoy this simple tutorial for an art roll!
You'll need a ribbon (approx. 30" long, 2 pieces of fabrics, sewing machine, scissors, paintbrushes)
All of my art rolls are made to my paintbrush set measurements, they are just a generic brand from my local craft store.
- Cut 2 pieces of fabric, 12" x 10" of the main fabric, these will be used for the interior and exterior of the art roll. 1 of these pieces I used some fusible interfacing for some added form.
- Cut 1 piece of coordinating fabric 13" x 13" which you will fold in half & iron
- Cut 1 piece of ribbon approximately 30" and fold it in half too
I started by adding a single straight stitch along the folded edge of the 13" x 13" piece of fabric. This is the fabric that will hold the paintbrushes in place.
Attach this piece to the 12" x 10" piece of fabric, right sides facing up. Stitch along one edge only.
Don't worry about uneven lines, these will be hidden when you attach the exterior pieces. Next, I take the longest paintbrush and slide it carefully between the fabrics to see where the bottom stitch should be placed. I mark it and then stitch all the way across the bottom. (this stitch line will also be concealed when you attached the exterior piece)
With my paintbrushes as my guide again, I see how far apart each stitch across will need to be. I want each paintbrush to have it's own slip pocket.
Now it's time to add the ribbon which you have folded in half, I use the raw edges of the ribbon and I sew them at the center point (paintbrushes removed of course). You'll cut at the fold at the very end, stitching this way ensures, for the most part, that your ribbon will be of equal length.
Time to attach the exterior. Right sides together you will be stitching along 3 edges leaving 1 edge to turn and finish later.
Trim excess fabric, cut the corners (but don't cut the stitch lines!) then turn and press flat.
The open side will need to be turned under, pinned and then stitched shut.
Time to trim that ribbon, I like to add a "V" shape in hopes that the ribbon wont unravel.
Now just put them paintbrushes in, roll it up and make a pretty bow and your favors are ready to be handed out! Please share your creations, I love to see the color combinations people put together. For me, I used a Japanese fabric with little girls, flowers and whimsical mushrooms, and a heart fabric to coordinate. I switched out the ribbons so each girl got something a little different.

.jpg)
.jpg)
.jpg)
.jpg)
.jpg)
.jpg)
.jpg)
.jpg)
.jpg)
.jpg)
.jpg)
.jpg)
.jpg)
.jpg)

.jpg)
.jpg)
.jpg)
.jpg)
These are just adorable - and such a fun idea - you are THE most amazing person I have ever had contact with - your parents are two very talented people and your brother is one of our good friends (from Clarkson Hockey days) - so glad I have the chance to be in contact with you and get a view of all your gorgeous crafted work. Nancy Markell
ReplyDeleteThank you Nancy, you are incredibly sweet. Your comments really brighten my day. Wish I could have met you the very few times I went to see Tman at Clarkson.
DeleteWhat a great idea! I love everything you make and it is fun to see the 'behind the scenes' work :)
ReplyDeleteThank you so much, Tami! I'll have to do a follow up post after the party, we'll see if they are a hit with the girls!
Delete